Sunday, 24 March 2013

Pumpkin Pie Bites


Hey everybody!!! I'm baaaaaaaacckkkkkkk!!! Thank you all for your patience as I have been studying my brains out trying to get my blasted degree finished. I'm not quite done yet but as of tomorrow I have exactly one month left!!!!!! I can hardly believe it!!! There are already so many exclamation points in this post!!!! There may be a few more busy moments for me as I get things wrapped up but I'm so close to the end and figured, well what the heck, let's get back to the fun things in life. Which of course, include blogging. So for my first post back, I'm going to share a recipe I made at Thanksgiving (yes, that's how behind I am so I'm sure you can all understand how excited I am to be almost done with my degree!! The first one that is ;) okay, where were we...)


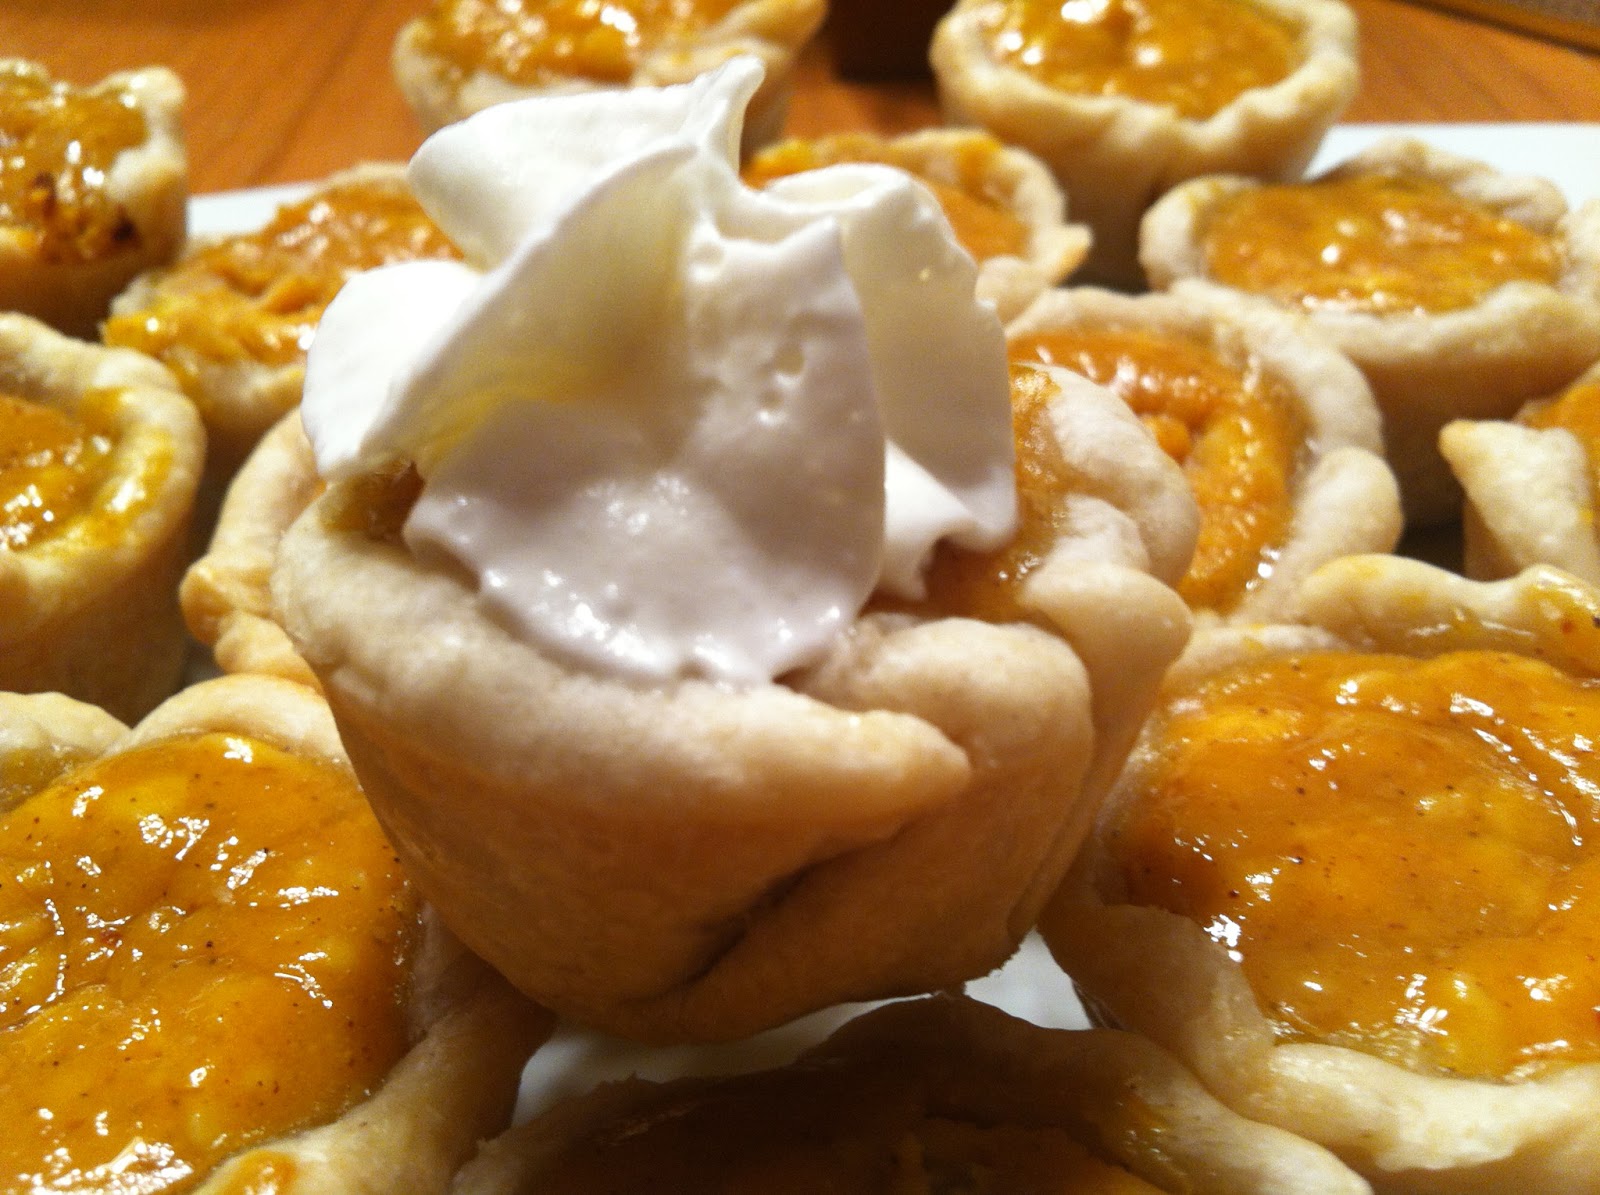
Pumpkin pie bites. The perfect holiday treat. They're excellent for those gatherings where you're all just standing around and eating all evening (which is pretty much how all of our Thanksgiving/Christmas gatherings go). They're super easy, super cute, and super delicious. The conclusion you can draw from that last sentence is that these are going to be your new favorite as I used the word "super" three times in a row. Enough said.

Ingredients:

2 refrigerated, ready to roll pie crusts (I used Pillsbury)
8 oz. cream cheese, room temperature (one block)
1/2 cup sugar
1 cup canned pumpkin
3 eggs
1 teaspoon vanilla
1 teaspoon pumpkin pie spice (or cinnamon, nutmeg, ground cloves and ginger mixed together. Here's how to make your own pumpkin pie spice.)

Tools:

3.5-4 inch cookie cutter (or round cup. Which is what I used. If you can believe it, I don't own a cookie cutter).
Mini-muffin tin
Rolling pin

First start by pre-heating your oven to 350 degrees Celsius. Then take the dough out of the wrapper and take a rolling pin and roll out even more (the dough doesn't need to be thick and you can get more pumpkin pie bites this way). Once the dough is rolled out, start cutting out your circles.

Keep balling up your leftover dough and rolling it out again until you really can't get another circle out of it. As you go along, place the dough rounds into a greased mini-muffin pan. I did 12 at a time, alternating cups so the dough wouldn't overlap. Like so...
Once you've cut out all of your little pie crusts, whisk up one egg and apply a little bit of egg wash to the tops of the crust. Now you can start making the filling.
Mix the cream cheese, sugar, canned pumpkin,  two eggs, vanilla and pumpkin pie spice together until combined. When I made this I had a little trouble getting my cream cheese mixed in smooth, so the next time I make it I think I will mix the cream cheese and eggs together first, then add the rest of the ingredients. Someone try it out and let me know how it works.
Spoon a little bit of the mixture into each of the crusts, almost to the top, but not quite. The filling will puff up a little bit so you don't want to fill the crusts right to the top before baking.
Bake for 12-15 minutes, or until crust edges are golden brown. Take the little pies out of the pan and set them on a wire rack to cool. Repeat for remaining pie crust rounds.
Aren't those just straight up adorable?
Top with whip cream and/or chocolate shavings to finish them off.
Until next time....

xoxo

-A (So good to be back!!!)


Friday, 15 February 2013

Quick Update...

Hey everyone!

I know it's been a while since I've posted, I'm sorry!! School is keeping me so busy but I will officially be done as of April 25th and graduating shortly thereafter!! I'm so excited for that day! I just wanted to let you all know that I'm still thinking about you and taking a short break from blogging is breaking my heart and I hope you can all bear with me until the spring. I'm planning on posting my weekly meal plans (I've had lots of questions about meal planning and I am a BIG believer in it so I'll make you one too) along with AT LEAST one recipe a week, maybe more since I'll have so much time on my hands once I don't have any homework to do! I hope to get a post or two in before then but I can't make any guarantees. Please stay tuned my friends! I'll promise I'll be back as soon as I can be.

Friday, 11 January 2013

Pecan Pie Cheesecake

I love cheesecake. Every type, flavour, whatever, I love it. Then this cheesecake came along and now I think I'm straight up in love with cheesecake. I've made this twice now and by the time the last piece is gone, I'm already ready to make another one.
I made this first at Thanksgiving and I think I this may have been a defining moment in my status as a baker/cook amongst my extended family. My brother told me later that after my cousin had his first bite he said, "What the eff..... I almost said f*** this is so good!" So, I guess that about sums it up. Also, I found this recipe on Pinterest, for original click here.

First, preheat your oven to 350 degrees. 

Crust Ingredients:

1 3/4 cups vanilla wafer crumbs
1/4 cup firmly packed brown sugar
1/3 cup butter, melted.

For the crumbs, I couldn't find any vanilla wafers in crumb form so I just bought a box of nilla wafers and crushed them up in my teensy food processor (I got the mother of all food processors for Christmas and I am SOOO EXCITED ABOUT IT!!!!!). Ahem, anyway, chuck your nilla wafers into a food processor thingy if you have one or just put them in a plastic bag and smash them all up into fine crumbs.
I did two batches of exactly that amount of nilla wafers (I would say there are about 20 in there, so maybe 40 nilla wafers in total?) and whizzed that up.
There is the first batch. So yeah, times that by two, like I said above.
Mix up the crumbs, brown sugar and melted butter and then press into the bottom of a greased 9 inch springform pan. Bake in your preheated oven for about 6 minutes, then set aside. While the crust is baking you can start making your pecan filling.

Pecan Filling:

1 cup sugar
2/3 cup dark corn syrup (I don't know if "golden corn syrup" classifies as "dark" because I couldn't find anything that said "dark" so I just used the golden kind. Worked fine if you ask me)
1/3 cup butter, melted
2 eggs
1 1/2 cups chopped pecans
1 teaspoon vanilla extract

Combine all the above ingredients in a medium sauce pan over medium-high heat and bring to a boil. Reduce heat and simmer for 8 to 10 minutes, stirring constantly. And by constantly, I mean CONSTANTLY. There is so much sugar in that pot that if you let it sit for even just a couple of seconds, it's in danger of burning. So make sure you've gone pee or whatever you need to do because you will be standing by your stove for at least 8 straight minutes. So anyway, stir until thickened (8 minutes is usually enough time) and then pour over crust.

Set that aside. Now you can make your cheesecake filling.

Cheesecake Filling:

3 (8 ounce) packages cream cheese, softened (If I know I'm making a cheesecake one day, I will take the cream cheese out of the fridge or freezer the night before and just leave it out on the counter until I'm ready to go.)
1 1/4 cups firmly packed brown sugar
2 Tablespoons all-purpose flour
4 eggs
2/3 cup heavy cream (aka whipping cream)
1 teaspoon vanilla extract

Preheat oven to 325. With a hand mixer or in a stand mixer, beat cream cheese at medium speed until creamy. Add the brown sugar and flour and beat until fluffy. Then add the eggs, one at a time, incorporating fully after each addition. Stir in cream and vanilla. Pour over pecan filling.
Woo! Action shot! Okay anyway, once the cheesecake filling is poured over the pecan filling, put it in the oven and bake for one hour. Once that hour is over, turn the oven off and leave the cheesecake in the oven for one more hour. DO NOT open the door to the oven. The blogger who posted this recipe that I used said that instead of a full blown water bath, she just filled a pyrex dish with very hot water and then put that on the bottom rack of her oven and put the cheesecake on the top rack and her cheesecake came out without a crack. Yeah, that didn't work with mine. Though the colour was perfect, you will see there was a crack in mine. Also the second time I made this I took the cheesecake out of the oven sooner and I still had a crack in it. So whatever. I came up with a solution that I will share shortly...
Okay, actually two cracks. Not so bad as it's not like it was right down the middle but because I'm a perfectionist there was no way I was going to serve the cheesecake with an obvious crack in the side. I, I just, I can't. It's not in my blood. So here was my solution. A chocolate ganache. Brilliant!! For the ganache, I used about 8 ounces of semi sweet chocolate chips (1 cup) and about 1/4 to half a cup of heavy cream.  I put those together in a microwaveable dish and then microwaved for short increments (about 10 seconds) stirring in between each until the chocolate was smooth and runny. Then I poured that whole thing over the cake.
And what a delicious dessert it was.
Pecans in a chewy, caramel-y layer with cream cheese and chocolate on top. Yeah, I can totally see why my cousin almost dropped an eff bomb.
The second time I made this cake, I did a chocolate ganache again, but I didn't use as much cream so the ganache was much thicker and once I cooled it, it became kind of a hard crust topping which I also quite liked.
Also, I didn't have enough pecans the second time around and though the cake still worked the pecan layer ended up being really hard to cut through given the concentration of "caramel" to the amount of pecans. Whatever, it was still delicious.

It's a snow day today (for me anyway, I live outside the city and my boss was kind enough to not make me brave the highways today) so I'm actually trying to be productive! Studying and blogging in the same day? I never thought that would happen!

Take care folks, and stay warm

- A


Monday, 7 January 2013

Tomato Basil Parmesan Soup

Who doesn't love an awesome bowl of awesome soup on a cold, blustery day in winter? Or really, any day for that matter? My husband and I started a tradition of Soup Sunday's a while back and though we don't make soup every Sunday it is probably my favorite day of the week to do so. You have lots of time (usually) to just sit around and let things simmer as opposed to other days that are filled with work/errands/other stuff. I try not to plan too much for Sundays as I reserve those days for family, church, and of course, making soup!

This is another recipe I found on Pinterest and when I did a Google search to try to find the recipe that I used, I found that there really are a million different variations. I looked at a few of them and some of them are pretty much the same but what really appeals to me about this recipe was that it used a slow cooker. And it was so easy and not to mention delicious. It made a large batch as well so my husband and I were eating this soup everyday for lunch that week. So here goes:

Ingredients:
2 (14 oz.) cans diced tomatoes, with juice
1 cup each, finely diced celery, carrots and onions (the Holy Trinity of soup making as I've heard this combination of vegetables referred to before)
1 teaspoon dried Oregano, or 1 Tablespoon fresh Oregano (dried herbs are much more potent than fresh herbs)
4 cups chicken broth (I prefer to use low sodium)
1/2 bay leaf
1/2 cup flour (all purpose is fine)
1 cup Parmesan cheese
1/2 cup butter
1.5-2 cups half and half cream, warmed
1 teaspoon salt
1/4 teaspoon black pepper

Directions:
add tomatoes, celery, carrots, onions, chicken broth, oregano, basil and your bay leaf to a large slow cooker.
Like so. Put the lid on the slow cooker and cook for 5-7 hours on low until vegetables are soft. I think I cooked for 5 hours only and the vegetables were cooked. You can leave the soup in the slow cooker on warm until just before you're ready to serve.
About 45 minutes before serving, prepare a roux (the same idea as for the Alfredo sauce in my previous post). Melt the butter in a sauce pan over low heat and add flour. Stir constantly with a whisk for a few minutes (the original recipe says 5-7, I say maybe 4-5). Slowly add in one cup of hot soup. Stir that up until smooth. Then add another 3 cups of the soup and stir again until smooth.
See how it's nice and thick and lumpy? Chuck that back into the slow cooker with the rest of the soup and give it a little stir. Add the Parmesan cheese, warm cream and salt and pepper. I had tasted the soup before adding the salt and pepper and I found that due to the Parmesan cheese the soup was salty enough for my liking so I didn't add any extra salt. Maybe a little more pepper instead.
Action shot! Anyway, once you have the last of the ingredients in, give it a taste and adjust any seasonings as you find necessary. Cover the soup up again and cook on low for another 30 minutes.
And there you have it. I served this with buns and garlic and herb butter. A perfect Soup Sunday if you ask me.

Take care folks,

xoxo

-A


Thursday, 3 January 2013

Chicken Penne Alfredo

This post will focus primarily on how to make a homemade alfredo sauce for those of you who may not know how. It's pretty simple once you get the hang of it and know how things are supposed to look and when to add certain ingredients. I tried to take pictures as I was going along which I will show you so you can get a visual however as I'm right handed it's hard to stir and take pictures with your left at the same time, so forgive me if the pictures are a little blurry. Also, you only need three main ingredients: butter, flour, and milk.

So, the way you want to start is by melting some butter in a medium sauce pan over medium heat. I would say about 1/4 cup. While that is melting get some flour (all purpose is fine) and have it at the ready. Once the butter is completely melted, start adding flour. We're making a roux! Add little bits of flour at a time and stir constantly as you don't want the flour to burn. Keep adding flour until your roux looks approximately like this...
Now you can start adding your milk/cream. I use milk as it's a little less fattening than using cream but cream also makes it that much more rich. So go for whatever you feel like. Pour in a little bit of milk (caution: the roux will get thick and stiff at first, keep stirring!!) and add enough milk until you can properly stir (I would say about a 1/2-3/4 cup of milk to start).
See how it's a little bit lumpy? That's what you're looking for at first.
Keep stirring and the sauce will start to get thick again, then add more milk.
These last two pictures were taken only a couple of minutes apart. I added more milk after the first picture was taken and kept stirring and the Alfredo sauce started to take shape.
Once you've added enough milk that your sauce is thick but still creamy you can start adding spices if you wish. If you're a Mennonite like me, basically add salt and pepper and you've got yourself a shmohntfat (somebody please correct me on my spelling of that word!). If you don't feel like being a Mennonite, add things like Parmesan Cheese, oregano, rosemary, Italian parsley etc (and obviously salt and pepper, that's a must).
This sauce is a little bit of a baby and needs attention basically at all times until you're up to this point. So if you feel up to it start making your pasta and whatever else you want, otherwise just wait until the sauce is done and keep it on low heat, remembering to stir periodically to check on the thickness. If it starts getting too thick just add a little bit more milk. If you feel it's too thin, just add a little grated Parmesan cheese, that works wonders for thickening up a sauce.
I cooked up a couple chicken breasts and I had some penne in my cupboard (I suppose you would "normally" see fettucine in this dish, but really, make whatever kind of pasta you want).
And there ya go. I would say this could definitely serve four people easily. I made it for my husband and I and we had leftovers for a few days.

So just for fair warning, I have been trying to post a bunch now in the off time between semesters however as of next week I may be posting even less than I usually do. I'm taking my last two courses for my B.A. (!!!!!!!!!!) so that will keep this girl pretty busy. I'll try and come back when I can and just know that I haven't forgotten about you, my faithful readers!

xoxo

-A


Thursday, 27 December 2012

Sushi Part Two

So this will be a quick one but I couldn't not post about the Sushi Extravaganza that my mom, my cousin-to-be and I had a few months ago. We made so much sushi and tempura and it was so unbelievably good that we actually couldn't even talk to each other about anything else. We kept saying "This is soooo good. No, really, this is sooo goooooddd!!" I had also never used raw fish in my own sushi before but I got some lovely sushi grade ahi tuna and salmon from Gimli Fish and it was top notch.
Here are the first batch of rolls we made. I don't remember what exactly was in each but we used combinations of tuna, salmon, mayo, avocado, carrots, cucumber, sprouts and probably some other stuff. No shell fish though because my mum is allergic! We made our own version of a Bakudan roll (because that's my favorite) which includes tuna, tempura crumbs and chili sauce and I think we also made an Alaska roll? (Jack, correct me if I'm wrong)
Look at that presentation courtesy of Jacquie. I must say I also have been enjoying pickled ginger more and more every time I have sushi (that's the pink stuff for those of you who are unfamiliar with it. The green stuff is wasabi, another must have for a sushi dinner).
All of our finished rolls. Not sure what us three women were thinking when we thought we could eat all of that by ourselves...
Some of our tempura-ed veggies happily frying away. This is about one eighth of the veggies that we made. We tempura-ed (yes, it's a verb!) carrots, cauliflower, mushrooms, green beans, asparagus, sweet potatoes, zucchini and peppers.
There's all of the tempura. Tempura sweet potatoes are my new favorite thing ever. EVER.
Our table setting. With all the accoutrements a sushi home-chef could want.
Also I should mention that my mom made ginger martinis using a homemade ginger simple syrup. Okay, I, ugh, I just can't. These are so amazing. SO amazing. Also rather powerful so they're good just for sipping. I'll get the recipe from my mother and post at a later date.
Alright, that's it for now. Up next, my recipe for a classic fettuccine alfredo. Something everyone should know how to make.

xoxo
-A

Chicken Saltimbocca

Have I mentioned before how much I adore Giada De Laurentiis? Because it's definitely worth mentioning again. She is one of my all time favorite chefs on the Food Network. Everything she makes is fairly easy but still somewhat challenging. You won't go completely out of your comfort zone cooking her recipes but she'll challenge and inspire you to try something new. At least that's what she does for me. I printed this recipe out ages ago and finally decided to try it. Really, it's not that complicated, just something fun and new to try.

What you'll need:
6 chicken cutlets, pounded flat
salt and pepper
6 thin slices of prosciutto
1 box frozen chopped spinach, thawed
3 Tablespoons olive oil
1/4 cup grated Parmesan
1 can low-salt chicken broth (14 oz).*
2 Tablespoons fresh lemon juice

* One thing I learned from watching Giada on TV is to always use low-salt/low-sodium chicken broth, that way you can control the amount of salt that is in your dish. You can always add a little bit more salt, but you can't take it away.

Pound your chicken cutlets flat and once that's done, sprinkle each with salt and pepper on both sides and lay flat. Place one slice of prosciutto on top of each piece of chicken.
Squeeze your spinach dry (or as dry as you can get it, it will still be moist either way). Place the spinach in a small bowl and season with salt and pepper then toss with 1 Tablespoon of olive oil until well coated.
Spread the spinach in an even layer over the prosciutto. Once that's done, sprinkle each chicken cutlet with Parmesan. Next, you'll need to roll up the chicken cutlets into jelly-roll looking rolls. This is why it's important to have the chicken as thin as possible. Roll up the chicken cutlets and secure with toothpicks. Don't be afraid to use three or four toothpicks in each. I had to use several toothpicks in each as no chicken cutlet will roll up perfectly.
While you are rolling up the chicken, heat the remaining 2 Tablespoons of olive oil in a skillet (make sure to use one that has a matching lid).
See what I mean about using a lot of toothpicks? Yeah, don't be shy.
Carefully cook each chicken bundle until golden brown, about 2 minutes on each side. You don't want to cook the chicken all the way through just yet. Once the chicken has a nice golden brown colour on each side, add the chicken broth and lemon juice and carefully scrape the browned bits off of the bottom of the pan. Bring the liquid to a boil and then reduce the heat to medium. Cover the pan and simmer until the chicken is cooked through, about 8 to 10 mins. Once the chicken is cooked through, transfer to a plate and drizzle some of the liquid over top.
Obviously I don't need to tell you this, but make sure you take the toothpicks out before you eat them! No one wants a toothpick stabbed in the roof of their mouth.
Eat it like this. Toothpick free and a little bit more Parmesan sprinkled on top. This dish would be one that is sure to impress company! Good luck, my friends.

Until next time,

xoxo
_A